Last Updated on October 4, 2024
A Picture is Worth More than All Those Keywords
- What is the Default Image Size for WooCommerce?
- Step 1 – Natural Lighting is Good Lighting
- Step 2 – Take Shots for Context
- Step 3 – Take Studio Shots
- Step 4 – Resize the Image
- Step 5 – Optimize the Image
If you’re a small business owner just starting your eCommerce site, congratulations! This is the first step in scaling both your revenue and your business. Setting up an online shop (like mine) with WooCommerce is free, and easy. An online shop is also a great way to improve your SEO!
You may have already chatted with your web developer or site administrator about images for your store. Maybe they said the image was too small.
Your WebDev may have used the term “pixelated.” If that’s the case then the image is too small for the required WooCommerce store settings. That’s okay. Let’s fix it.
Other small business owners bog down their first WooCommerce stores with images that are too large. This is the downside of that new iPhone (24 megapixels or 6000 x 4000 px) or Google Pixel (3072 x 4080 px).
Not only is the resolution overkill for a WooCommerce store, but the file sizes are huge. Your customer on their mobile phone at 3G or shady WiFi won’t be able to see the photo of your revolutionary eBike line before they bounce out.
Hot Tip: Are you looking to kick your online shop up a notch with video? Here are 7 tips for optimising your video content!
What is the Default Image Size for WooCommerce?
According to WooCommerce’s documentation, the required size for a single product is a width of 600 pixels. Anything smaller will look pixelated. Anything larger (without image compression and optimization) will slow down your website. A gallery thumbnail will default to 100 x 100 px and an image thumbnail will be 300 x 300 px.
We suggest creating a square image of your product in Canva, for example, that is 600×600 pixels. There’s no reason to upload an image larger than required.
Now that we freaked you out about photo sizes from our cell phones, let’s talk about some great tips for your WooCommerce product photos.
Step 1 – Natural Lighting is Good Lighting
Natural lighting helps show off your product the best. In other words, taking a shot of your Meadow Green Fiesta Bowl in the sunshine shows its true color.
If you’d like your product to give a warm feeling to the buyer, take advantage of the golden hours right around sunrise and sunset. Have a friend pose on the eBike at sunset at the beach. These magic hours produce soft enough light not to cause harsh shadows yet provide enough light to enhance the richness of your product’s colors. It allows your customers to imagine themselves using the product. Which leads to context or lifestyle shots.
“During the golden hour, the sun is at a low angle in the sky, creating longer shadows and flattering lighting situations you can use for more creative effects.” Adobe
Step 2 – Take Shots for Context
Sometimes product context shots are called lifestyle shots. If you play your cards right, you may not even need to take this photo. Services like Canva can create context photos for you – from your studio shots (see below).
What does the eBike look like next to your car? Show the eBike on a trail near the ocean. How big is the laptop sticker? You get the idea.
“Lifestyle shots are highly beneficial for nearly any product in every category and can supplement or replace some studio shots in your product’s gallery.” FitsSmallBusiness.com
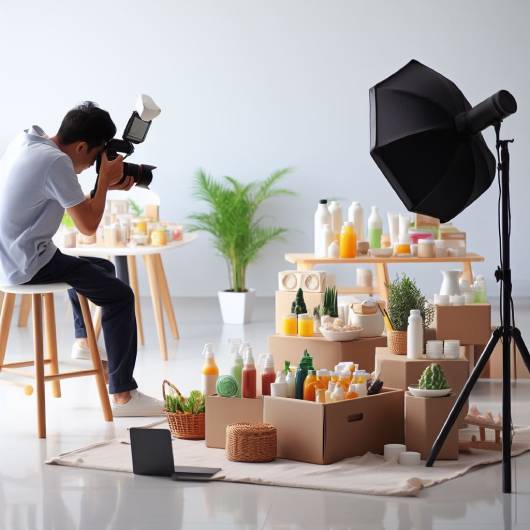
Step 3 – Take Studio Shots
Studio shots are key to successful eCommerce product pages. It may require that you buy a lightbox on Amazon to take photos of your pottery pieces or hand-made jewelry. This is a purchase that is worth $30. You’ll get your money’s worth in the volume of sales. Now, in the case of an eBike, a studio shot will be a bit different. You’ll need a backdrop (greenscreen) and a softbox lighting kit. Still, the price can be around $60 and it’s an investment well worth it.
While we’re at it, grab yourself a tripod or two. A clicker is even better. Shaky hands are no bueno when it comes to product photography. These studio shots can be used in Canva or any AI image generator like WorkMagic. With a starter plan less than a Netflix subscription, it’s probably a good first step.
If all of this seems really overwhelming, then consider using a service like Soona. They have fast and affordable product packages that will put you way ahead of the competition. If a photo has a thousand words, then we want those to be positive, presales copy.
“In still life photography, the best sellers are the images where the subject is easy to recognize and is over some colorful background. It must be bold. Clean and geometry in composition seems to help.” Bogdan Breva
Step 4 – Resize the Image
As we mentioned in our opener, you’ll want to resize your image before uploading it to your WooCommerce store. The same principles apply to the WordPress Media Library in general. Upload the right size every time and you won’t regret it. You’ll limit your storage and improve optimization. That’s a win-win
For WooCommerce products, resize your images to 400 x 400 pixels. Download a JPG file and also a PNG with a transparent background. You may need a transparent background for lifestyle photos, depending on who you’re working with. Use the JPG file for optimization & compression.
“Your store may require Retina-quality images (better), and you know it needs to be faster, so then the only solution is a CDN and faster web hosting.” Perfect
Step 5 – Optimize the Image
Depending upon how your site is built and who it is hosted with, you may also want to optimize your image as well. Well, you should anyway. Unless you’re selling wedding photography, you probably don’t need uncompressed images. Users are likely to bounce if your images don’t load within 3 seconds, so it’s not a risk worth taking for a new shop like yours.
There are tons of tools for image compression both on and off your website. TinyPNG is a free tool to optimize your image before uploading it to your WooCommerce Product Page. If your WordPress website has WP-Rocket’s Imagify plugin, it will do the work for you – including for your already installed images.
“No matter what, you should always be using some type of compression on your WooCommerce product images, as it’s an easy way to cut file size without changing anything else.” WP-Rocket
Need an eCommerce Site? Hire a Local WebDev.
WebDevs build eCommerce sites. I rebuild websites and online shops. I design eCommerce websites. We even fix the websites you broke (it happens).
Choose an experienced eCommerce agency that has your back and the reputation to prove it. We want to partner with you to make your online store a success.
Let’s book a call today!
Image Content credentials: Post Image Generated with Bing Image Creator AI ∙ October 18, 2023 at 7:09 AM